My last class, this fall, on fermenting vegetables and making your own kefir and maybe a little on sourdough bread, will be next Thursday, Nov. 21 at 6:30 at the Real Foods Market in Orem at 400 West just north of 800 North. This company is so awesome selling raw milk and range fed meats and so many other good-for-the-body things.
Raw milk is seen by the "authorities" as a dangerous anomaly which needs to be constantly watched, tested and monitored. "They" would love to shut down this business on any excuse they can find. Trouble is, they can't find anything. This company knows they operate on the "edge" and so their operation, dairy and facilities are cleaner than expected. The people on the ranch/dairy in Redmond know they have to exceed the standards to stay in business.
Very courageous people.
Wednesday, November 13, 2013
Thursday, November 7, 2013
Fermented Garlic to the Rescue!

Everyone knows that garlic is a pathogen killer even viruses, but getting the fresh garlic in you is the problem. OK, supplements can bypass the unpleasantness of fresh garlic but how effective are those supplements? How expensive?
Here is the best way I think....fermented garlic. They are very edible. The fermenting process tames the "bite" and sting of eating fresh garlic. I don't know how it does this, but eating fermented garlic is easier. When I feel that "wiggle" in my sinuses or throat and especially that slight headache when I bend over, I know what's coming and I get out a new bottle of homemade fermented garlic. Usually, if I eat 5-6 that first day and second day, the early symptoms are gone!
Garlic can be labor intensive getting the papers off all cloves but there are ways around it. First, look in local grocery store for a whole package of peeled garlic. I have found that commercially packaged fresh garlic, ferment just fine. If not there, buy some bulbs and peel your own. A trick I learned was to separate a bulb of garlic into cloves and place all of them in stainless steel bowl. Hold another equal size stainless bowl over it and gripping the rims of both bowls firmly together, shake hard. Stop, pick out the peeled ones.....vigorously shake again and stop and pick out the clean ones. Dump the papers out and shake again until they are all peeled.
In a clean wide-mouth clean jar, pack the clean, peeled garlic cloves. You can add little pearl onions and maybe some fresh dill or other whole seasonings.
You must add 1 TBS. Real Salt (high mineral sea salt) dissolved in about 2 cups of chlorine-free water. When I have all the garlic stuffed into the jar, I pour water in and pour out to see how much water is needed, then I dissolve the salt in this amount of water.
I attach my air-lock lid and set at room temperature for a week for ferment. If I don't see obvious bubbles of fermenting within two days I will add 1 TBS. whey to increase the lactobacillus in the jar for fermenting. In my picture above, the brine looks brown, it really isn't brown like that...(a trick of my amateur photography I guess) it's more milky than brown.
As for color, if your garlic turns blue or purple, it is still Ok. I had a batch last winter do this and I still ate them. A chemical in garlic is reacting to the iodine or some other trace mineral in the salt causing the blue color.
At the end of a week, this time year I do not refrigerate, I will either start eating them or just label and set downstairs in storage.
Thursday, October 31, 2013
Update: Sauerkraut and Vegetable Ferments
I've just done some reading about the importance of keeping oxygen out of vegetable ferments like sauerkraut and giving ferments more time to ferment without premature refrigeration. Thought would pass this information along to my class participants.

For one thing, this time of year it is not necessary to put ferments into the refrigerator 5 days after the ferment time. With weather temperatures cooling down and most home temperatures cooling down also, this step isn't necessary. The "experts" are concerned that home vegetable fermentors are not allowing enough time for the full fermentation process to take place when they put the jars of vegetables into refrigeration too soon. Some are suggesting that room temperature fermenting should take at least a week or more before removing air-lock lids and securing more permanent lids and putting in storage. They say, allowing longer ferment times at room temp. and then storing in cool dark places for up to 6 months or more produces a much better and more nutritious sauerkraut or pickle without "failures" (mold and other bad microbe pollution).
Ferment "failures" for the most part, happen because too much oxygen gets into the jar, under or around the air-lock lid or other device, and allows bad yeasts and molds to get a hold of the food product. Lactobacillus bacteria and the good yeasts need anaerobic (oxygen free) environment to flourish, reproduce and make lactic acid and the other enzymes that are good for us. The bad yeasts and molds grow and thrive with oxygen. So, whatever device you use, make sure that it can keep air out and still allow carbon dioxide to also escape.

Ferment "failures" for the most part, happen because too much oxygen gets into the jar, under or around the air-lock lid or other device, and allows bad yeasts and molds to get a hold of the food product. Lactobacillus bacteria and the good yeasts need anaerobic (oxygen free) environment to flourish, reproduce and make lactic acid and the other enzymes that are good for us. The bad yeasts and molds grow and thrive with oxygen. So, whatever device you use, make sure that it can keep air out and still allow carbon dioxide to also escape.
Monday, October 28, 2013
Beet Kvass; green printout error
The way it is printed, I did not specify what size bottle for the beet ferment. It should have said to use a 2 quart bottle packed with chopped beets and 1 TBS salt dissolved in 1 quart of chlorine-free water. Some might have interpreted the recipe to use 2TBS of salt with a 2 quart bottle.
The general rule with Sally Fallon recipes is usually 1 TBS salt with 1 quart of vegetables and water but this Kvass recipe works with 2 quart bottle and only 1 TBS salt.
I hope that clarifies the directions. I love my beet kvass and have found many people making it and using it regularly. It was from a couple of those fermentors that I understood my error. They were getting kvass that was too salty.
Hope this helps.....now is good time to harvest those beets and make kvass. After I have made a second ferment from a batch of chopped beets, I usually cook some of them up and serve with melted butter, a little bit of sweetner and some vinegar. Tastes like my mother's pickled beets when she packed them with sugar, cloves, distilled vinegar and then "water bath" cooked them. I Iiked the flavor of my mother's pickles but healthwise, they were "dead".
Better to get the fermented juice (living) from them first then cook them. Maybe some people like the crunchy raw fermented beets as they are, but they are too crunchy for me. I put the rest of the beets on my compost pile.

Friday, August 23, 2013
Oil Pulling: an Old Technique to Detoxify

This is one crazy technique but it's cheap enough and easy enough to try. It's also very old, going back to ancient India; it's an Ayurveda technique that has been used for centuries but it is new to us. We have been doing this for 3 weeks and have noticed a couple of very subtle shifts.
The process is to take a big spoonful of oil in your mouth and hold it there for 15-20 minutes without swallowing it. Swish it around in your mouth and push-pull it through your teeth. Then spit it out and rinse your mouth out with water.
Easy! if you don't have a serious gag reflex.
What it is supposed to do is "pull" bacteria, toxins, viruses, infection from your mouth, sinuses, throat, ears and skin. Go to this link for full explanation. www.oilpulling.com
This is what I have noticed since doing this...1) My sinuses, throat, ear canal and voice are cleaner and clearer. 2) my mouth is cleaner...no irritating gum infections ( I don't have much trouble with that anyway, but lately there's be none!) 3) my facial skin is clearer...tiny little bumps have disappeared.
My sister and husband stayed at our house for a week this summer just as we were starting this and I invited them to do this. They were just crazy enough to do it. My sister called me last night and told me that her husband who had a suspicious sore on his cheek, reported that the spot is shrinking and the white flakey center is gone.
We are going to keep doing this, could be important.
We are using a cold press, organic sunflower oil as was suggested by the website. They also suggest seseme oil but I haven't tried that one. The sunflower oil seems to work just fine. But virgin coconut oil works even better but I hate to spit out the coconut oil and am tempted to swallow it.
This is what I have noticed. 1 big spoonful of oil on an empty stomach at first doesn't seem like very much, but after a couple minutes your mouth fills up. It pulls saliva and in that are enzymes that change the oil and then the mucus comes and the other yucky stuff. By the time 15 minutes are up, my mouth is very full and I'm have a hard time keeping my lips together. When I spit, the once clear, golden liquid is white and opaque...which is what is supposed to happen and it is full of bad stuff. Go to the website and read what this is about. It might be very useful to you. I'm going to keep doing this. www.oilpulling.com
Thursday, August 22, 2013
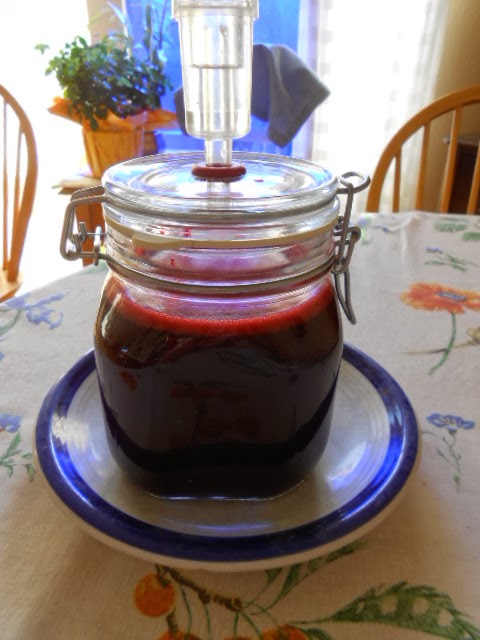
Blackberry Juice Fermented

My neighbor and friend has some wonderful blackberry canes in her backyard and invited me to harvest some. I've never really worked with blackberries before because I don't like the big seeds. But this was too good a gift to turn down. I washed and blended the berries with a little water and then strained the seeds out of the juice. Blackberry juice is not very sweet, so I thought it might be possible to ferment it without it creating too much alcohol. I used my one liter fermenting bottle and filled it with the raw blackberry juice and added 2 1/2 tsp. Real Salt. ( liters are not quite a quart so I used less than the usual 1 TBS of salt). I installed the airlock and left it out for 5 days to ferment. It sure did ferment...bubbling up into the airlock and turning the airlock water purple! I just took it out and rinsed it and re-installed it. The finished ferment tasted salty but not "alcoholy" so my guess was right. I put it in a quart jar and set in refrigerator for another 4-5 days of cool down. I haven't put it downstairs because I keep sipping from it a spoonful at a time. I like the taste of it.
We all know that dark colored blue and purple fruits are loaded with antioxidents so that's good but now this lovely dark purple juice also has living lactobacillus and other enzymes and bio-nutrients common to fermented foods. It's a winning combination.
The rest of the juice I turned into regular jelly/jam with high heat and sugar. It's good too but not as nutritious as the ferment.
Monday, August 19, 2013
Teaching Kefir and Sauerkraut Class Fall 2013
Thanks to Real Foods Market, I have some dates set for teaching my Kefir and Sauerkraut classes.
Sept. 26, 2013 at the Orem Real Foods Market 400 West 800 North , just north of the Sonic drive in. 6:30 pm. $10 fee to be paid a day or so before event. I will sell live kefir grains for $10 and other starters for Kombucha, sourdough bread and maybe some water kefirs. Emphasis will be on raw milk kefir and it's benefits and uses and how to make homemade sauerkraut from cabbage. These two foods I feel are the easiest for the beginner and provide the most "bang for the buck" the nutrition "buck" of course. I have plenty of cultured/fermented foods to taste.
October 30, 2013 At the new Real Foods Market, Sugarhouse Store 2209 So. Highland Drive in same area as Whole Foods Market. 6:00 pm. Same agenda and fee and starter sales as above.
November 21, 2013 at the Orem Real Foods Market a week before Thanksgiving. 6:30 same agenda and fee and starter sales as above.
I haven't got a date for the Real Foods Market in Heber yet, still working on that.
I don't have any private home dates yet either but I am certainly open to any suggestions. I love doing home classes. The hostess just collects 2-3 dollars from those she invites to pay for my gas. I take starters and plenty of samples to taste of home grown cultured/fermented foods. It's a lot of fun. Best way to reach me is
joannesmithseal@gmail.com
Good News for Salt Lake County; Real Foods Market Opening
Raw Milk and other wonderful natural foods are coming to Salt Lake City! Real Foods Market is opening a store in Sugarhouse, my old neighborhood. It's in same area as the Whole Foods Market on Highland Drive. Real Foods Markets are doing a very good business and they can now open this Salt Lake Location. Grand Opening is Sept. 28 at 2209 So. Highland Drive.
I am teaching a Raw Milk Kefir and Sauerkraut class there Wednesday,October 30 at 6 pm. My class has a $10 fee to attend, paid a day or two before event and will be selling kefir starts and other starts for other cultured or fermented foods. Check out Real Foods Market on facebook or their website.
I am a crusader for raw milk and raw milk kefir and cheese. I know that since adding raw milk kefir to my diet, I have reversed my bone loss and my bones are denser and stronger than 15 years ago. I am an O blood type and since complying to the O diet, left milk products out of my diet because pasteurized milk products were against the O diet and I have not for years been able to digest lactose. Os and As as adults just don't digest lactose well or at all. But when this Real Foods Market opened up here in Orem 3 years ago, and I bought my first set of live kefir grains and started making my own kefir, I have upgraded my health. For 2 reasons 1) kefir is a pro-biotic food that has boosted my gut flora and thus improved my immune system 2) I have another high quality protein food back in my diet. Os need a lot of high quality protein and raw milk is one of the best.
I am excited for the folks in Salt Lake County who can now get raw milk with all it's great nutrition for themselves and especially for their children.
Saturday, July 6, 2013
Water Kefirs; I Think I Know Why Mine were Sick

I have for several months now, tried to get water kefirs up and going. I started this time with a small amount of dehydrated water kefirs from Cultures for Health. I ruined my last batch a couple years ago and didn't try again until January of 2013.
I followed directions very carefully. I used "Wholesome Sweeteners"
organic sucanat sugar and some bulk sucanat sugar I get at my local health food store. I believe that was the problem...sucanat.
After a very short time they began to get slimy, like snot was growing around the crystals and the kefir was thick and syrupy. It didn't have a bad taste, it was just syrupy. I didn't think that was right. The crystals didn't grow very big and they didn't seem to be multiplying.
I checked online with Cultures for Health website and found directions for "cleansing and resting" water kefir grains. I made copies of those directions and did as directed. I cleaned them off ( with distilled water) and mixed a "resting" solution for them and left them in that solution for a week and then tried to make kefir water again...with sucanat. Within a couple batches they were slimy again the kefir was syrupy again. I again cleaned them and put them in resting solution for a few days but their numbers and size diminished.
Finally, I decided to try new food. I measured 1/4 cup plain white sugar and 1/2 tsp. "Brer Rabbit" full flavor, dark molasses to one quart of chlorine-free water. It seems to be working! It must have been the minerals in the dark molasses. The directions say that kefir grains need a consistent supply of minerals and I suppose that the sucanat just doesn't have enough.
My kefirs are in 3rd batch of sugar and molasses and are getting bigger and more solid when I strain them. I haven't noticed any slim yet and the resultant kefir water is not syrupy and it tastes good and had a definite fizz to it that the syrupy kefir didn't. I hope this is the answer because I would like to sell these guys and have water kefir again for myself.
Sunday, June 16, 2013
Digestible, Wheat and Spelt Seeded Bread with Natural Yeasts

So what is so wrong with (indigestible) commercially baked bread or my own homemade bread? Isn't "wheat for man"? and isn't bread the "staff" of life? Yes and no.
The wheat in our contemporary culture is" super hybridized" for one thing. It started just after WWll with mountains of ammonia nitrate used for explosive;.what to do with it in peacetime? could it be used as a fertilizer? Yes, if scientists could make the wheat and other crops more agreeable to it.
Thus started the bio-engineering or cross breeding of the basic wheat plant. The result.....a wheat that had a shorter stalk, was resistant to pests and molds and rusts and the like and, AND it had greater gluten (protein) and higher starch. Dreams of greater crop yields and more protein to feed a hungry world became reality and the world rejoiced. The "green revolution" began. However, there was no testing on humans to determine if the newer wheat proteins could be digested or even tolerated by humanity. 60 years later, unheard of gastro-intestinal problems are being manifest in more and more adults and now children. When a doctor suspects a "food allergy" one of the first things he might recommend is to stop wheat products......for good reason.
The wheat of today is NOT the wheat of our ancestors, it is a different food, a more toxic food. And just recently, GMO wheat was discovered in Oregon fields. Many of us who have been watching Monsanto trying to push" Round-up Ready" wheat on the U.S. and Europe ( they still refuse to allow American GMO wheat into Europe) were fearful that this might happen sooner or later. We have had powerful natural food advocates fighting Monsanto and our government to keep this new, wheat out of American fields but apparently their efforts failed. Their efforts to get GMO labeling on foods has failed also. Our government is determined to support big agri-business and not the health and well being of it's citizens.
The problems with wheat is that it has "super starches" which are addictive and feed the bad yeasts in the gut and "super-proteins" which are indigestible and can cause trouble once they get into the blood stream (leaky gut syndrome) and go where undigested proteins shouldn't go like joints which triggers the body's defense mechanisms and causes inflammation known a rheumatoid arthritis and other such disorders.
The next problem with wheat is it's "overuse" in industrial and convenience foods which are cheap and taste good. Wheat starches as "modified starch" and other dirivitives, are a key ingredient in too many industrial foods. Too Much Wheat!
The problem with wheat bread is that it is made today with "quick-rise" yeasts.....synthetic yeasts were put on the market in 1984 according to Caleb Warnock, " The Art of Baking with Natural Yeast". synthetic yeasts were designed to rise quickly which was wonderful for the baking industry but the yeasts do nothing for predigesting starches and gluten so you get a wonderful smelling, great tasting, quick loaf of bread that can harm you. Our comfort food has been turned into a toxic food for a good share of us. ( I recommend reading "Wheat Belly" by Mike Davis.
The good news is that there are ways around all these problems with wheat and synthetic yeasts. The information I am giving is by no means complete and you need to do your own research while still available, but I have a process of making some baked goods that do not cause the health problems that I used to suffer from. I hope you can put to practice something here that may be useful to you.
Recipe For 1 big loaf or 2 med size loafs or 4 small ones (small loaf pans)
3 1/2 to 4 cups flour can be combinations of fresh ground wheat or spelt or white flour or sprouted wheat or spelt flour. Spelt is an ancient wheat not hybridized yet.
1 cup chlorine free water
1 cup natural yeast starter from your starter in quart jar in fridge
1-2 TBS good fat like butter or olive oil (not coconut oil as it will kill the yeasts)
1 1/2 tsp. sea salt
1 tsp. chia seeds
1 tsp. flax seeds
2 TBS raw or toasted sunflower seeds
Combine all ingredients, batter will be a little stiff. Using an electric mixer will help. I use my clean hands. If shaping into bowles like above picture, then stiff batter is good. If baking in loaf pans then a more moist batter is good.
All flour should be moistened. Shape into one big lump in large bowl and cover with plastic. Put in a cold place like fridge for at least 24 hours. 48 hours even better. Bread dough should be double in size even when cold. The longer it can stay in the cold, the more the yeasts can "work" on the starches and gluten.
Take out cold dough, and work it with your hands on a floured surface for a few minutes to warm it up and get elastic. Shape into loaves either into 2 bowles or into your greased bread pans. If doing bowles (balls) flour a piece of parchment paper and sprinkle some corn meal on it and place the bowles on that. The parchment paper could be on a cookie sheet. Lightly slice the top of each bowles a few times with a serrated knife. Whether in bread pans or on parchment, allow dough to rise again at room temperature for another 3-6 hours
.

We want the yeasts to do their work outside of us not in us....not in our gut. When yeasts get to the overgrowth stage in our gut, we've got trouble. These yeasts (candida) when overgrown will cause inflammation of the gut which causes intestines to bloat and expand which allows undigested proteins and other things to escape and get into our blood stream causing all kinds of problems like lupus and rheumatoid arthritis. The bad yeasts demand food from us and their food of choice is sugar and starches. So, we crave starches and sweets to feed them, it doesn't do us any good.
When the dough has risen and the yeasts have done their work for us, we kill them with heat.
If baking bowles, we will bake at a high temperature like between 400 and 450 preheated and you will need a shallow pan on the bottom shelf of the oven to put one cup of water in so that there is some steam in this hot oven. Bake bowles for 25-30 minutes.

If using baking bread pans, then 350 degrees will do and bake for about 30-35 minutes for one big loaf or 20-25 minutes for 4 small loaves.
Give bread a few minutes outside of oven to finish baking and cool down then slice and lay on the butter or coconut oil. Bread digests better with good fats. Cheese is good on warm bread too.

Tuesday, May 14, 2013
Grandaughter Will Eat Vegetables; If they are Fermented!

We put her recipe all together then used chlorine free water and 1 tablespoon of Real Salt per quart. We used wide-mouth quart jars and found some drinking glasses. whose bottoms fit within an inch, the openings of the wide-mouth jars for the fermenting process. The glasses fit into the jars just enough to keep the floating vegetables down under the brine. I wish I had taken a picture of them.
I had to leave so did not see or taste the results. When I got home I repeated a similar process and left them to ferment 5 days, repacked the vegetables into 4 quart jars, lightened lids, then cold storage for another 5 days. I kept one quart in my fridge after tasting them and the other 3 quarts are in my basement. They are wonderful!
Now here is the punch line.....when my son called me, I asked him how those "pickles" turned out and he excitedly told me that they turned out great but the best part was that SHE ate them and asks for more! My fussy granddaughter will eat vegetables prepared this way! Is the spices? Is the salty? is it the texture? They don't know. Could it be her body wants the pro-biotics? Don't know....it is a wonder. I am hoping that this might be a good motivation for other frustrated parents or grandparents to try no-cook, vegetable fermenting.

You will need.....Chlorine-free water, a variety of vegetables, some pickling spice, some Real Salt or other mineral rich sea salt, and some clean glass jars.

For 4 quarts of pickles ; 2 large 2-quart jars
4 carrots peeled and cut into sticks
4 stalks celery trimmed and cut into 3 inch sections
10-12 peeled garlic cloves
half head of cauliflower cut into florets
2 low to medium heat peppers sliced long and seeded
half head of green cabbage cut into small wedges
1 large turnip partially peeled and cut into sticks
2 medium onions cut into quarters or small pearl onions peeled
2-3 sprigs of fresh dill
4 TBS "pickling spice"
4 TBS Real Salt or other mineral-rich sea salt
2 quarts or more of chlorine-free water
Clean, trim and chop vegetables and pack clean jars. Press down with your fist. Make sure each of 4 jars gets garlics and fresh dill and the "pickling spice". Dissolve the salt into 2 quarts of chlorine-free water and then fill the jars to within 1 inch of top. The vegetables will want to float so this is where you need something clean and heavy to weight down the vegetables under the brine. The "starter" is all ready on the the vegetables. The starter is friendly Lactobacillus bacteria and it is on all healthy, produce from a healthy garden. They eat or consume the sugars from the juice of the vegetables. Normal rinsing of garden vegetables will not wash them off. You have to sterilize the vegetables with come chemical or cook the vegetables to kill them off.
For fermented "pickles" we want those bacteria on the vegetables and on your hands and knives and chopping board. They are very salt tolerant. The salt water or brine protects them while they consume the vegetable sugars and produce all the wonderful vitamins and bio-enzymes that are so good for us. They also produce Lactic acid which preserves the food and tastes so good....kinda like vinegar but not as harmful and acidic. It's actually alkaline which tastes like acid vinegar but is very good for our bodies. Fermented vegetables, is how our ancestors processed much of their garden produce to last through the winter and with it's minerals and vitamins they were able to retain their health until they could get spring produce and the next harvest. They used big ceramic crocks with crock plates that fit and held the vegetables down under the brine.
The 'air-lock' systems you see in my pictures were constructed from Tattler Lids which fit our wide-mouth jars so well and air locks from a beer brewing company. If I did not have these, I would use glass jars, marbles or something else heavy that will fit the jars. These are just so convenient. The fellow ferment er that constructs these and sells them is Dr. Kyle Christensen of Utah County. A set of 2 he sells for s13.00. He can be reached at email address; kylesinthegarden@gmail.com

Thursday, May 9, 2013
Natural Yeast, Mulit-grain, Seeded Crackers

The idea is to mix the flours with sourdough or natural yeast starter and water or whey or kefir and let sit at room temp for 8 or more hours. I let my dough sit for 2 days, but this long, I put the dough in the fridge. A food processor is useful making this recipe because the dough is rather stiff and hard to mix. I like mixing and squeezing with both hands.
Dough
1/2 cup starter
1/2 cup whey, or milk or kefir or yogurt
1 1/2 cup whole spelt flour or wheat flour
1/3 cup rye flour
1/3 cup millet flour
1/3 cup oat flour or brn rice flour
1/2 tsp chia seeds
1 TBS flax seeds or toasted sesame seeds
1 tsp Real Salt
1/2 cup soft butter
1 1/2 tsp baking soda (right before baking)
Sunday, May 5, 2013
Preparedness Expo; Orem, Utah

Two days of talking, teaching and selling starters and some cloths and Precious Prills. I had a great time teaching folks about getting healthier with fermented foods. Hello, to all who talked to me and actually looked up my blogspot. It was so nice to meet all of you. I'd say 2/3 of the people I talked to knew something about fermenting and and half of those were doing kefir or yogurt at home. The other 3rd had never heard of fermented foods before so it was great fun for me to teach about it.
I have learned that beginning fermenters will do best with one fermented food at a time andt first one I reccomend is milk kefir. Milk kefirs are pretty hard to kill off, and they do a good ferment of any milk within a short time....like 18 to 24 hrs. They also are very tolerant of the natural lactobacillus in raw milks. With yogurts you have to heat raw milk up to kill the lactobacillus because the yogurt strains of bacterial do not like the competition for lactose ( I guess that is the reason) anyway, it's hard to make yogurt with raw milk. I've heard of a strain of yogurt that will tolerate the lactobacillus but haven't picked up a start yet. I have 2 different kinds of milk kefir starts, one for raw milk and one for pasteurized milk. They are a little different but both work very well in turning milk into kefir.
Kefir just tastes good too especially if you blend it in a smoothie with some fruit and juice and just a little stevia for those in the family that like it sweeter. Another thing you can do with kefir or yogurt is separate cultured milks using a cloth like the one I demonstrated at the Expo, into whey and soft cheese. The cheese can be scraped off the flat polyester cloth I sell and stored in a container in the fridge and flavored either with fruit jam/preserves or flavored with garlic and herbs for a dip. The whey can be used to ferment other foods especially canned foods like beans and salsa and fruit juice. Heat canning kills natural lactobacillus and other bad mircroes as well, but the food is basicly dead. It has some nutrient value of course, but with some pre-planning you can open that food and introduce some whey with living lactobacillus and give it a couple, three days of fermenting and you can boost the nutrition and add flavor with the lactic acid the microbes make.
Kefir is just so versitile and so "gut friendly" as a pro-biotic food and so easy to make that is really is the best choice for a beginning fermentor.
Second choice after you get the hang of kefir, is sauerkraut or some other fermented vegetable "pickle".
Check out my older posts for these recipes and processes.
Tuesday, March 26, 2013
Fermenting Classes April and May 2013
I am teaching a few fermenting classes in April and May. Classes will cover 4 basic groups of fermentation; milk kefir, beverages including kombucha, water kefir and whey fermentation, grain soaking or sourdough and vegetable ferments. Classes will take about 1 1/2 hours. Most are with Real Foods Market.
Wednesday, March 27, at 1 pm at the Orem, Real Foods Market 800 N. 400 West.
Thursday, April 4th at the Heber City store, Real Foods Market at 6:30...475 West 910 So.
Tuesday, April 9th evening at 7 at Tina Crowder's home in Orem 451 N. 950 East
Friday and Saturday May 3rd and 4th at the UVVU Events Center, Emergency Family Preparedness and Gun Show...I .will have a booth and be demonstrating kefir and selling starters.
Thursday, May 30 at 6:30 at the Orem, Real Foods Market 800 N. 400 West.
Wednesday, March 20, 2013
Don't Use Coconut oil for Sourdough Bread
I have finally noticed that when my sourdough bread doesn't rise, in other words, fails, it seems to be because I used coconut oil in the dough instead of olive oil or butter or ghee. Coconut oil really does kill microbes....it must be killing off the natural yeasts in the dough. I have better outcome with the other fats. Just a warning, maybe something to this maybe not.
Friday, March 15, 2013
BEET KVASS revisited

Second ferment; Chop up the beet cubes to release more juice....like one cube cut twice. Fill with chlorine-free water and add more salt but not as much this time....1 1/2 TBS salt and let ferment another 5 days at room temperature. This second ferment is thinner but still effective.
Third ferment: After I pour off the second ferment water, I take the beets and ginger pieces and put into my food processor with more chlorine-free water and process. Now all the juice that is possible is out. I also add about 1/3 cup kefir whey to this last ferment just to be sure of getting enough lactobacilli into the juice to consume the sugar. I add only 1 TBS salt to ferment and again allow it to ferment 5 more days.
When I pour that off, I throw the beet mass onto the compost pile since there is very little nutrition left in it.
The 1 liter jar with air lock to the right is my turnip ferment and the quart jar to the left has rutabaga in it. The rutabaga turned out to be too chewy and crunchy, the turnips are just right.
Sunday, March 3, 2013
Fermenting Class in Buhl Idaho
Saturday, March 2 in Buhl, Idaho. My husband, Perry and I were invited to Buhl to teach a class in fermenting foods. It was a long way to go from Orem, Utah but sooooo worth it. What wonderful people up there....so generous and curious and great questions! I loved all of it and meeting so many intelligent, and interesting people. Thank you all for coming! I hope to go up there again in a few months and teach another class on a related subject. It was a fine event. If any of you want to talk to me and ask question, please use the phone number on my green card or email me.....also on green card or up at the top in my header.
Friday, February 8, 2013
Chocolate and Blueberry Starter Cake

Sponge Ingredients (night before or morning of)
1 cup natural yeast starter
1 cup water or whey or kefir or milk
2 cups whole wheat pastry flour
6 TBS cocoa powder (very important for this to soak)
1/2 tsp Real Salt
optional; some dried blueberries or other fruit and some walnuts
Mix all this together and cover with plastic and allow to set
at room temperature overnight at least 8 hours or more.
Final Batter Ingredients
2 eggs
2 tsp. vanilla
1 1/2 cups sugar, natural sugar like sucanat
1/2 cup blueberries frozen or fresh
2 TBS coconut oil melted or softened
Combine all of this in a blender or food processor and then
mix with the soaked sponge mixture.
Add 1/1/2 tsp baking powder which will neutralize any sour
taste and puff up the batter. Pour into greased baking dishes
2 regular size or a 9x13. Bake at 350 for 30 minutes until tooth
pick comes out of center clean. Serve with ice cream or just cream
and more blueberries.
Quick and easy frosting can be made with 1/2 cup heavy whipping
cream warmed up enough to melt 1/3 -1/2 cup chocolate pieces.
Thursday, January 31, 2013
The Importance of Soaking Grains, Nuts and Seeds

There's a lot of talk lately about eating whole grains and that's good...a step in the right direction away from super refined flour and grains the "white stuff" but along with that admonition should be careful instructions about how to prepare those whole grains and soaking should be the number one priority. Why? Well it has to do with a chemical that is on most all plant "embryos" in other words, seeds, nuts and grains. It is phytic acid which is strong enough to taste on some seeds and not so obvious on others. Phytic acid is a plant defense mechanism. The plant wants it's seeds to become more plants and so this is a protection. If the animal doesn't like the taste and won't come back for more it is in the plant's best interest. Phytic acid will bind the minerals and vitamins in the seeds and grains so that the animal gets very little nutrition out of it especially if it goes through the digestive system of the animal quickly and that is also in the plant's interest especially if the seed is eliminated whole in the feces it has a good chance of sprouting into the intended plant. For humans, phytic acid is a nutrition blocker in other words when ingested, it binds or blocks the calcium, magnesium potassium selenium and other nutrients so they do not get absorbed into the intestinal wall and into blood stream. To get around phytic acid's nutrition blocking ability, the grains, nuts and seeds must be soaked; soaked in just plain water for at least 8 hours. Water and other liquids neutralize phytic acid with enough time and it is not necessary to change the water after soaking.
Pictured above is a sample of my morning breakfast cereal of amaranth, quinoa, chia and whole flax seeds. I take a cup of this dry mixture and soak it in a quart jar with 3 cups water overnight. I cook all of it up the next morning and use only a portion of it for that mornings breakfast and put the rest of the cereal away in a container in the fridge. I heat it up other mornings.
My husband likes a combination of rolled oats, spelt, flaxseed meal and chia seeds. I use 1/3 cup of this dry mixture and soak it with a cup of water the night before. He cooks it up the next morning and flavors it how he likes it.
I soak all my grain before cooking, even brown rice which has low levels of phytic acid. There are other benefits of soaking grains the primary one is that the starches in the grains start changing, softening so to speak and turning into sugars which are easier to digest than straight starch.
I soak my raw almonds, pumpkin seeds and walnuts. Many people find that eating raw walnuts is distasteful for them. This is because the phytic acid on walnuts is strong and some people are affected by it. So, soaking for a couple days then draining off the water and drying the nuts on paper towels neutralized the offending chemical and they can eat and get the many benefits of walnuts.
Bread can be very toxic to people. Which is a shame because bread should be nutritious and comforting. Commercial bread even those with combination of whole grains are probably not nourishing people as much as they could be if the bakers took the time to soak the grain and the flour made from grain. But time is money and producing a tasty loaf of bread quickly means more profits. Ignorance of the importance of soaking is also a factor. Another injury to bread is the use of quick-rise yeasts. They were invented in 1984 to boost the industry. Quick rise yeasts do exactly that.....make the bread rise faster without allowing the necessary time for the dough to slowly rise as with old fashioned or natural or sourdough yeasts. The old way with natural yeasts require a good 6-9 hours to rise and that is enough time to neutralized the phytic acid in the flour and grain and allow the natural yeasts to begin the process of breaking down the starches and deconstructing the proteins ( like gluten) that are giving so many people problems now. If the bread baker wants to continue using quick-rise yeasts, at least combine all the flour to be used with all the liquid in the recipe and the salt and other ingredients and allow that dough to set for 8 hours or more and then add yeast last. Bread can be nutritious again if the flour is allowed to soak at least 8 hours first in a starter with natural yeasts.
Grains and bread can be more nutritious and not so toxic if the homemaker will think ahead and allow enough time for the flour and grains to soak in water or milk or other nutritious liquids. Using a natural yeast starter for bread instead of quick-rise yeasts will greatly enhance the digestibility and nutrition of this universal comfort food.
Just found out that cocoa powder has lots of phytic acid and needs to be soaked for at least 8 hours before baking.
Thursday, January 24, 2013
The Flu; Without Drugs or Antibiotics
I'm 67 yrs old and it took me 5 weeks to heal from the flu. It's been a nasty winter season for humans but a good one for the flu virus. I was determined to face this enemy without vaccine, over-the-counter drugs or antibiotics. The result? I was miserable. I thought my immune system was better than that and I thought I could do effective battle with the "beast" with only my essential oils, MMS, vit. C, lots of rest, good supplements, warm teas with lemon juice and honey, gargling with Thieves mouthwash and saline water nasal rinsing and silver solution nasal spray. I look back on it now and I really didn't know what I was doing most of the time because I was so "out-of-it".
Fortunate for me, I am recently retired and did not "have " to go to work....teaching school (like the last time I was this sick with flu, winter of '09) so I did have the time to doctor myself. My husband worked everyday otherwise he could have helped me more, but I was so sick that I just forgot to do things for myself and I didn't get as much rest as I probably needed. It's tough being both patient and nurse.
I caught this virus the end of November 2012 when it peaked, according to the newspaper and I still don't know who or how I caught it. I'm not around young adults anymore, so I just don't know how. I didn't get the vaccine, never will get it as I don't believe in vaccines anymore. My adventure started with slight headache, when I bent over, and slight heaviness in the back of my sinuses. Once I felt that, I knew I was in-for-it. I started to put drops of essential oils (the Young Living ones) under my tongue and on the tip of my thumb and at the back of my throat. I don't gag easily so this was easy to do. I gargled with salt water first then switched to Theives Mouthwash. I also used oregano oil but it is very strong or "hot" and it took a few days to realize that I should dilute it with olive oil before putting it on the back of my throat. I changed my diet by reducing the amount of good food I was eating and upped my liquid content. I did not stop making and drinking my homemade raw milk kefir smoothies with pineapple juice and fresh pineapple, blueberries, spinach and green powders. Had it had been pasteurized milk I would have cause it is the pasteurized milk that causes excess mucus. I cut out all the fun carbs that come with Thanksgiving and the Christmas season and ate as much fresh and cooked vegetables as I could and fruit and eggs and meat and salads, but as the sinus infection increased, I just lost my appetite all together. I really tried to keep lots of liquids in me.
I hate sinus infections and over my lifetime I've had a few....not as many lately as I used to before I seriously started to eat healthy to the Blood Type diet first then morphed into the WAPF lifestyle (the two are compatible for an O). About 3 weeks into this, my sinuses hurt awfully just breathing dry air so I finally purchased a steam humidifier for the bedroom which really helped and I got a diffuser for oils which also helped. I just learned that the flu virus likes dry conditions! With moist, oiled air at night, I was finally able to sleep especially with my head up higher than my chest with a stack of pillows. I took oils by capsule. I bought a bag of 00 clear capsules and dropped oregano, Theives, purification and others into the capsules and swallowed with water. I think that helped. In the mornings, a good saline solution rinse out of my nasal passages, really helped clear the gunk out so I could spray some silver solution up in there. There was lots of gunk....I filled garbage bags and went through at least 2 big boxes of Kleenex.
When I am sick with the flu, I get very sensitive to the cold..... going out is a real challenge and I bundled up whenever I had to go out and I warmed the water before I mixed the salt into it for the nasal rinse. I wanted all my liquids to be warm. I got out of my stored camping gear, an Aladdin 36 oz Thermos bottle in the form of a coffee picture and put my lemon tea in that. All day I could pour warm tea from that without having to heat it up every time. (We do not use microwave oven). I have since bought another thermos because it was so useful. I took hot baths with Epsom salts and essential oils every other day which warmed me up all over and opened my sinuses and bronchial tubes.
The infection did go into my bronchial tubes and I coughed and coughed. At this point I was concerned about pneumonia and was prepared to go to a doctor and get antibiotics if that developed. It didn't! I was very fortunate that I didn't get pneumonia, so I never did visit a doctor or get drugs or antibiotics. So, maybe I didn't do so badly. 5 weeks of being sick is not fun and I wanted it to be over and done by week 3 or 4 but it dragged on. And then the herpes viruses came out on my upper lip! I used lavender and frankincense on that area of my lip where I felt the "tickling" and the oils kept it from really "flowering" like it usually does.
I did use my MMS but I used the wrong water and it made me sick so I did not use it effectively. With MMS, you mix two solutions ( citric acid solution and sodium chloride solution in ratio of 5:1 ) and wait 3 minutes and then mix with water to stabilize it then swallow and then drink apple juice to lessen the nasty taste. I just found out that you are not supposed to use regular tap water to stabilize it but use distilled water otherwise it makes you sick. Ha! that was what I was doing, so I don't think the way I was using it was effective. Next time....distilled water! Distilled water for the humidifier too and the diffuser.
I think I could have done better with the oils.... I could have done much better with everything, but, bottom line.... I did get well on my own ( not really my own, as I did pray frequently) and my immune system did "kick in" so maybe my experience didn't turn out so badly.....I believe I now have my own antibodies for this particular virus that could help me with the next bout.
Any suggestions out there? any questions? I'm still learning all this.
Subscribe to:
Posts (Atom)